Ultima Online: Stygian Abyss Client Overview

The UO:SA client came out in the summer of 2009. Compared to the UO:KR client it was a major step forward. The Stygian Abyss is truly a remarkable client, easily customized to any possible type of play style. Also know SA is very stable and the performance is very good. Here is a table of contents for the topics we will cover in this overview:
Getting To Know The Client
The Basics Of Macros
Macros For Skills
The Atlas
Mining With The SA Client
Adding A Custom UI
 Getting To Know The Client
In the beginning there is the Main Menu, home of the User Settings, likely the very first place you will want to visit. This is where you can get the main part of the client set up to your liking.
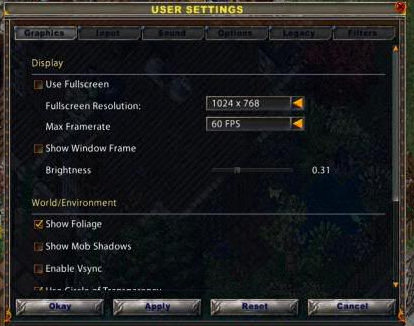
Graphics Tab is the first tab of the user settings and where we will begin.
Here you will make adjustments needed, many are your preference but some will help for performance. Example would be the Particle Detail and Idle Animation (setting these to low will help if you are suffering from performance issues). Enable Vsync is an option for those with LCD monitors.
Now back to the picture, you can create as many hotbars as you like, you can move them anywhere, you can have them line up vertical or horizontal, and you can adjust the size.
To move them you just simply drag and place where ever you like. To adjust length or alignment you click on the yellow arrow and drag it.
The hotbar is like a magic macro maker, the process is quick and simple.
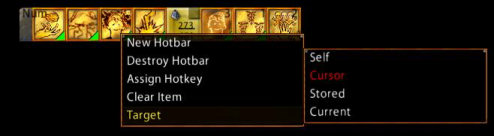
To open up the hotbar options you single right click on any hotbar square. You can create new hotbars from here to assign targeting methods if you unchecked legacy targeting in the user settings.
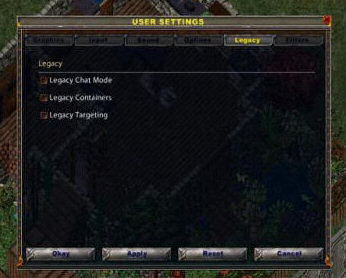
Note that you can use MMO Input and have Legacy Chat/Containers.
Speaking of chat there are two ways to change chat modes, you can simply click from the menu found at the little yellow bubble or you can change modes by /g spacebar, which will put you into guildsay.
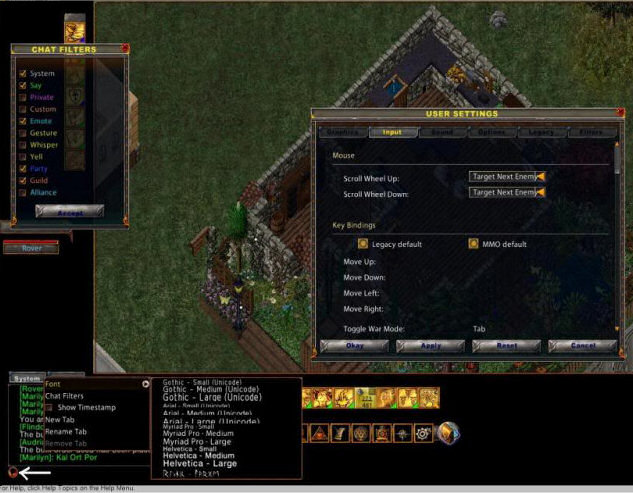
By single right clicking on the chat circle (marked with the white arrow) you open all of the cool chat options, this is when you chat window is locked. Here you will be able to set up filter, fonts, or even add extra tabs.
On the User Settings box we have Input opened, this is where you can decide to use Legacy default or MMO default. These are preset keybindings in the SA Client, you can change them anyway you like. To erase a preset keybinding you will click on Move Up (for an example) the Action will highlight yellow, at this time you can hit the Esc on your keyboard to erase it, or hit the desired key you would like to assign to the action.
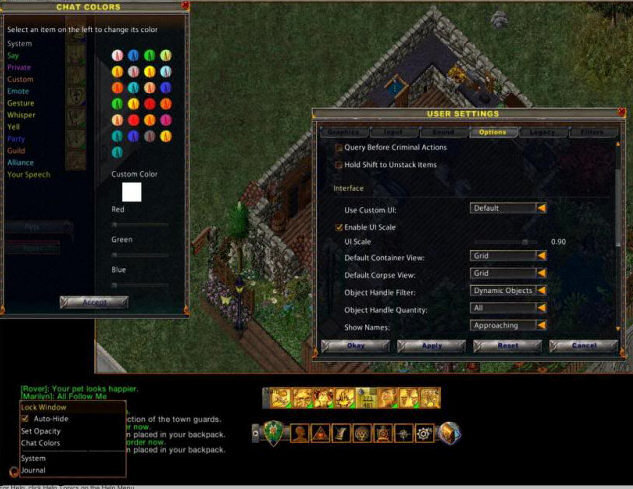
When your chat window is not locked into position you can right click the System or Journal tabs for the options and be able to select your Chat colors or Fonts. To change the colors you click Your Speech (for example) then select form any of the colors showing or create your very own custom color.
In the User Settings we have the Options tab opened. One of the coolest features is to Enable UI Scale. What this does is allow you to scale down parts of the client, paperdoll, backpack, hotbars, etc. Once you find the size you want you just hit apply and your good to go.
The Object Handle Filter is your ctrl + shift option, this allows you to customize what ctrl + shift shows and how. If your hunting in a crowded area and having problems finding the corpse you can select corpse from the Object Handle Filter, now when you use Ctrl + Shift only the corpse will show. You can also select Quantity, which is said to help in lag situations if you turn the Quantity down to 50.

To resize the hotbar containing the skills, quest, virtues, etc you click the white circle, this also can be moved anywhere on your screen. If you have the Legacy container view unchecked (turned off) you can select from grid or list view by clicking the circle area on the backpack.
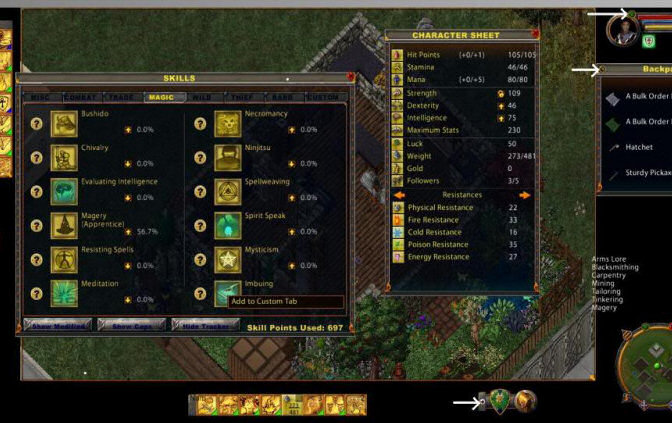
By clicking the circle area at you health bar you can open you char sheet, can also open it from the main bar. Here is where all of the information about you char can be found and more. If you want to be able to watch your weight while out hunting you can drag the icon to the left of weight and drop it to an open spot on the hotbar (it's really very cool, if you get close to being overweight the icon changes color). Everything has an icon that can be put into a spot on the hotbar. At the bottom of the Character Sheet you see Resistances (yep no more math), by selecting the arrows next to it you can view all the rest of your character information, from LRC to HCI and everything in between.
In the Skills section you can right click to add the desired skills to the custom tab. This has a very cool option, which is Show Tracker. With this option selected it will create a list of you skills outside of the skills window, in the screen shot they are showing on the right. What this does is allow you to see gains as they happen, really effective for those tight templates.
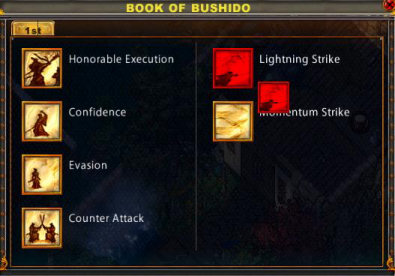
When you select open your Paperdoll not only will you find your Character Sheet (open scroll icon) but you will also find your Characters Abilities, the Weapon tab contains the primary and secondary weapon specials.
Your play window can also be resized and moved. Moving is simple just pick it up an place where you like it, resizing (also simple) you click on the yellow arrow on the bottom right of the play window and drag to the size you desire. You can also zoom in or out, the preset binding are + zoom in - zoom out * reset zoom. these bindings can be set to whatever you like under input in the user settings.
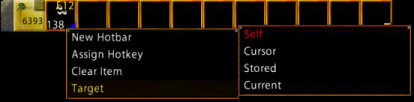
If you take a look at the hotbars you will notice the green/blue colors at the bottom of each hotbar square. This shows how the spell is targeted. Target Cursor shows green, Target Current shows blue, and Target Stored shows black.
The Basics Of Macros
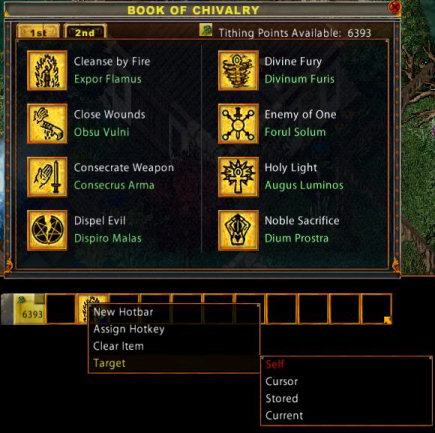
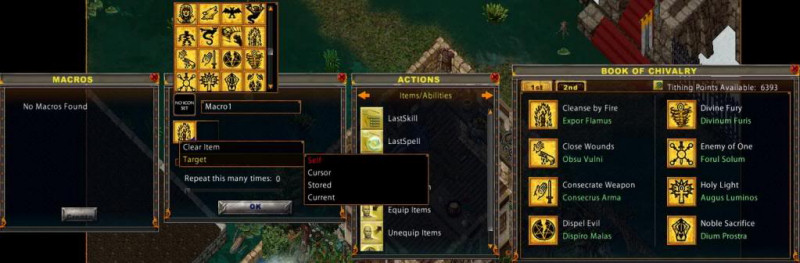
You can make a macro though the hotbar, we will make the cleanse by fire macro using the hotbar. In the picture above you have your open chivalry book, you drag the cleanse by fire icon from the book and pace anywhere you like in an open slot of the hotbar. You can then right click on the Cleanse by Fire Icon in the hotbar and select your targeting choice.
This is with legacy targeting turned off, Legacy targeting does not allow you to set targeting options by right clicking.
For an example in the difference between using Legacy targeting or not using it, we will look at two versions of the same macro.
First we will show you an invis self macro built using legacy targeting.
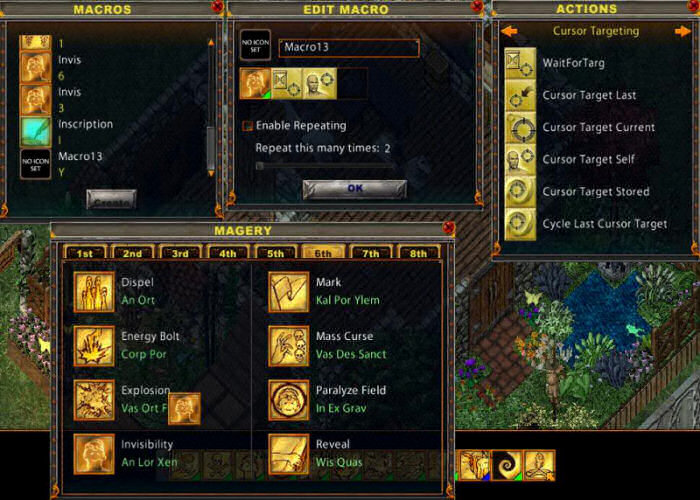
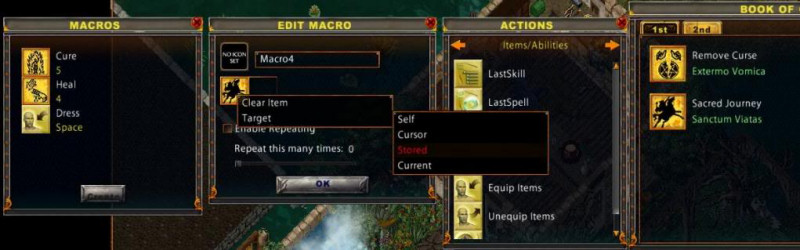
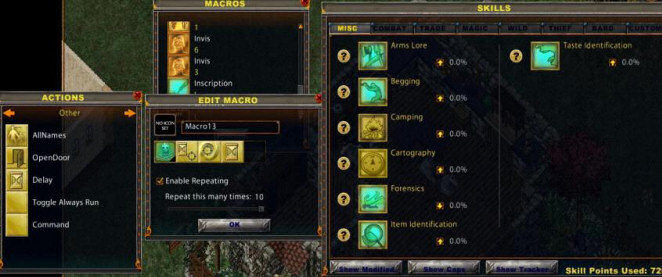
This Macro was built in 3 parts, first the spell being dragged from the spellbook and placed in the action slot (edit macro box), second action box contains the Wait for Target (pulled from the actions menu on the right), third action slot in the Edit macro box contains Cursor Target Self (also pulled from the actions menu on the right).
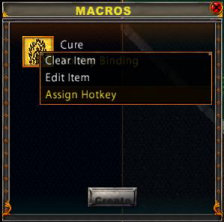
At this point you can name the Macro (instead of calling it macro 13) or select an icon for it (which is helpful if you putting macros in the hotbar). Select OK, and you newly made macro will show up in the left menu titled Macros. Now you can right click the macro and assign it a hotkey.
Here is a look at the same macro Invis Self created without the legacy targeting.
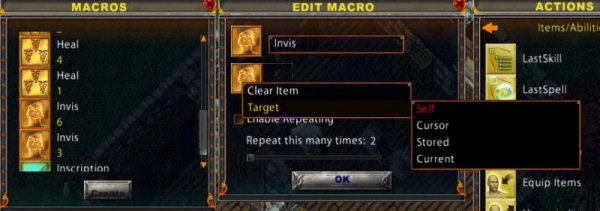
Here you drag the invis spell from your spellbook, placing it in the action box, right click the spell for targeting options. Target Self. Select OK, and from Macros right click to assign a hotkey.
Here we will show you step by step building of a Cleanse by Fire macro.
Step 1 From the Main Menu select Macros
Step 2 Hit Create
Step 3 Open your chivalry book and drag Cleanse by Fire to the Action slot in the Edit Macro window.
Step 4 Right click Cleanse by Fire and assign your preferred targeting
As an option you can assign an icon to the macro by clicking on the box saying No Icon Set, this will open the icon menu shown above of icons you can choose from. To select one just click it.
You can click on the bax saying Marco1 and name your macro.
Step 5 Select OK
Step 6 your new macro will show in the box to the left titled Macros, now you can right click the macro and select assign hotkey.
To create an auto dress macro you select create and from the Actions Menu drag Equip Items to the Action slot in the Edit Macros box.
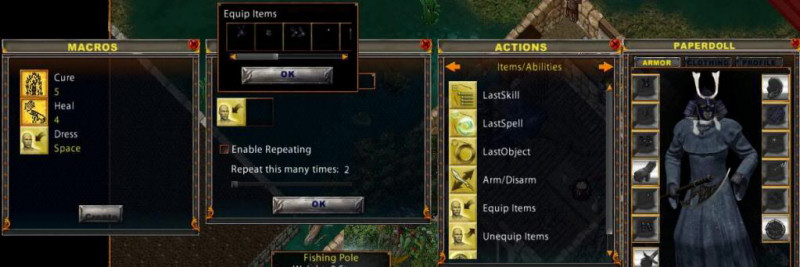
A box will appear above waiting for you to drop the item you want to equip into the box. In this case we are making an auto dress, so you will open your paperdoll and start dropping your armor into the box, each time you add a piece of armor a new box opens. Remember to add you clothes. Once everything has been added select OK. Your new macro appears in the left side box (Macros). Now you can right click and assign a hotkey.
The equip Item action is also used for switching weapons. My archer is able to switch between 6 bows with each being a single key press. In some cases you may need to unequip prior to using the weapon. In this case you can build a macro with the Unequip Items being the first action, selecting the hand/s pointing down in the menu, then placing an equip items action in the next action slot (edit Macro), when the box opens above the Equip Items drop the weapon you are setting the macro up for into it.
There is an arm/disarm action you can use instead of the Unequip Items, the general rule of thumb is if you need 2 arm/disarms your better off to go with the Unequip.
In this picture we visit the stored targeting option. I haven't played a great deal with this cool feature but know it works great for a 1 key travel macro.
Here we have pulled the Sacred Journey spell from our Chivalry Book and dropped it in the action slot of the Edit Macro box. You right click the spell for your targeting options, for this we select stored. Your cursor changes to targeting and you select a runebook with a default location set. Now select OK and from the Macros box you right click your new macro and assign it a hotkey.
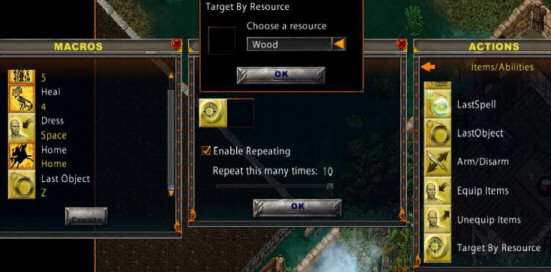
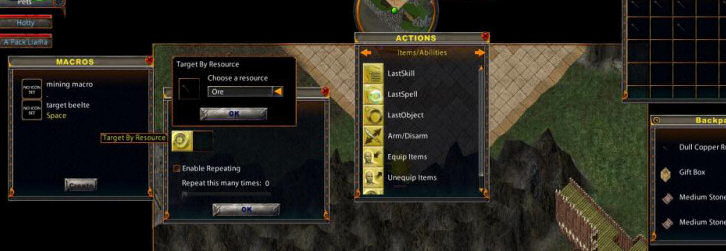
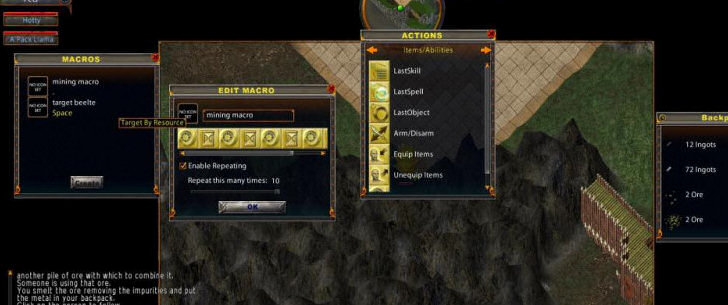
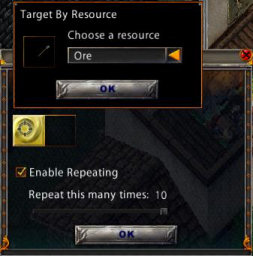
The Target by Resource is a very cool action, as a crafter you have to love it :). For this macro we drag the Target by Resource action and drop it in the action slot of Edit Macros. A box appears and you drop a hatchet, etc. With wood selected as the resource you hit the ok. For this type of macro we use the enable repeating and drag the slider to 10. Select OK and your ready to assign a hotkey.
The macro is the same for mining, except you will drop a shovel, etc into the action slot of Edit Macros Box. Make sure you enable the repeating. The mining macro in SA does not need to be reloaded ever as long as you make sure you don't run out of shovels.
For my bandage macros, I prefer to make it though the hotbar, that way I can always see how many aids I have left. Also has a cool timer that show. To do this you just drop your bandages into an open slot on the hotbar, right click to assign targeting method and right click again to assign a hotkey.
While bandage self is very nice, sometimes you will need to bandage someone else. For this I just make another hotbar macro, take the same stack of aids from your pack and drop into and empty hotbar slot. Right click to assign targeting (for this one I use target cursor). Then right click again to assign a hotkey.
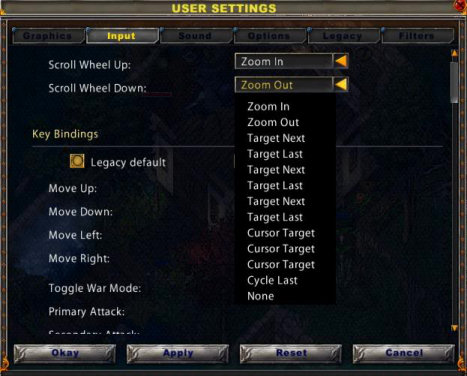
In this picture we are in the Main Menu, User Settings, Input tab. With the Legacy targeting turned off you will get many targeting options for use with the scroll wheel.
Any spells from any spellbooks can be pulled and dropped into a hotbar slot or the action box for being made into macros.
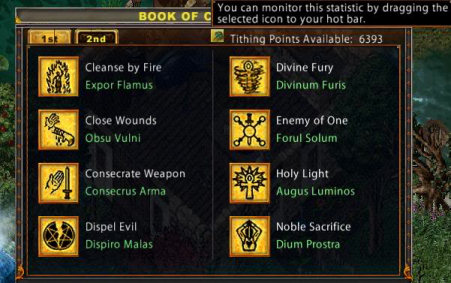
Including the very cool Tithing Points Icon from the Book of Chivalry.
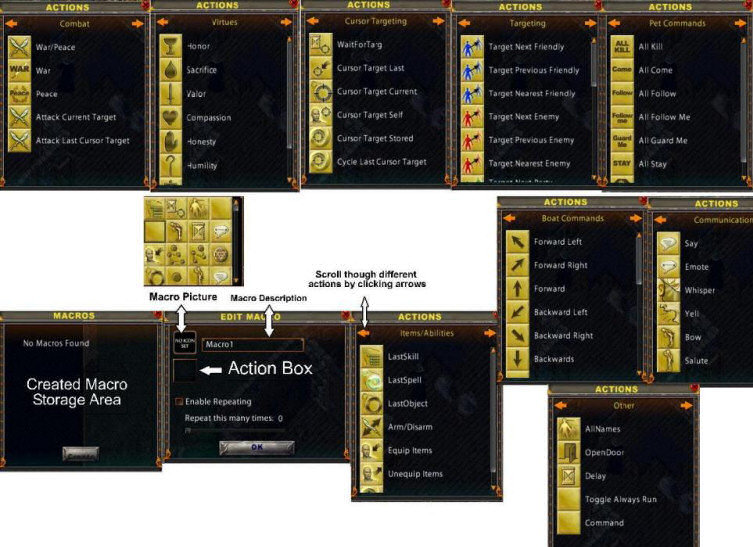
You can also go to the Main Menu, Actions, and place any of the action into the hotbar, just as you can move your created macros to the hotbar. And there are plenty of actions to choose from. by clicking the yellow arrow you will see Items/Abilities, Combat, Virtues, Cursor Targeting, Targeting, Pet Commands, Boat Commands, Communication, and Other.
Anything can be dropped in the Hotbar or action box of a Macro.
Note: Any action that requires cursor targeting it's a good idea to add Wait for Target between the action and the targeting. There is no delay to the macro by adding this.
I am really no good at all for those wanting to use Legacy targeting, but from what I have read the macros would be built the same way as without legacy targeting, will just require more action additions.
Macros For Skills
Skills can also be made into Macros.
When you open up your skills window and skill that is highlighted green can be placed in the action slot of a macro or in an open slot in the hotbar.
In our example we will be building a macro to work the poisoning skill.
The first thing we do is drag the poisoning skill from our skills window and place in the action slot in the edit macros box.
Right click the poisoning skill and select targeting, stored. Now that you cursor has changed to a target select your stack of poison in your pack.
In the next action slot in edit macro place the wait for target action from your action menu.
The next action slot you place the Cursor Target Stored action from the action menu. Target the fish steaks in your pack, or whatever you are working poisoning on.
The following action slot in the Edit macro box you need to add the delay action (once again from the actions menu). Right click the Delay and set it for 10.0
Now you just need to select enable repeating, and move the slider to 10.
Name the macro / add a icon for it if you like. Select OK. From the main Macros box right click your poisoning macro and assign a hotkey.
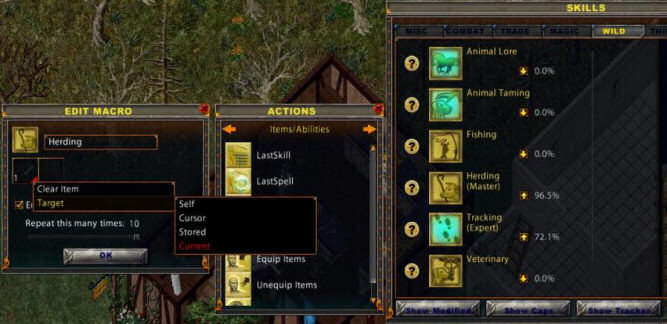
Even skills that aren't highlighted green can be made into macros. In this example we will make a macro for herding.
For this macro you simply drop the crook into the action slot in the Macros area, or drop the crook unto an open slot on the hotbar.
Since your working the skill you will want to enable repeating.
 The Atlas
The atlas (i.e. world map) is greatly improved in the Stygian Abyss client. When you open your radar map (select the green circle area) you can view the Atlas. Clicking the arrows on either side you can scroll thought the different facets, or you get a nice drop down list of which facet you want to look at by clicking the triangle box. We have selected Ilshenar.
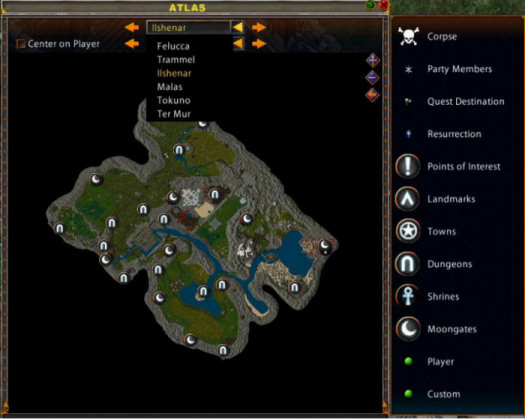
The diamond shaped buttons to the right top of the map allow you to zoom in+/out- or open the window with the map options (show legend arrow), shown in the far right panel.
By clicking on the options it more or less turns what is viewed on and off.
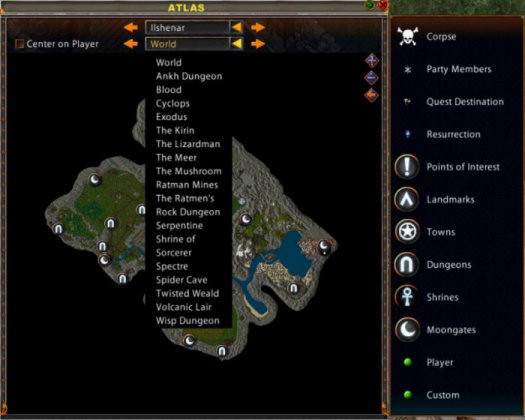
This is the world box, here you can select which area you would like to view.
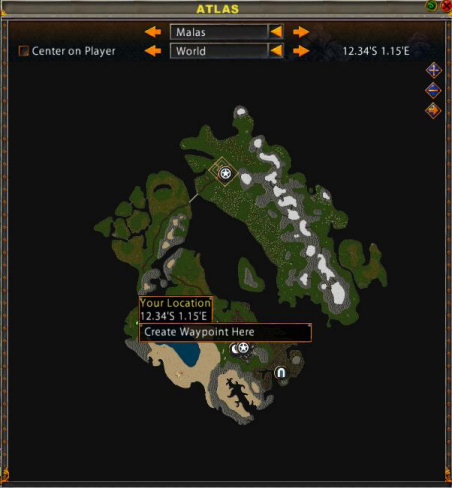
To create a waypoint is very simple. Where ever you would like one created you right click your location on the radar map or atlas then you will get the create waypoint here box. Once you click that area another box opens.
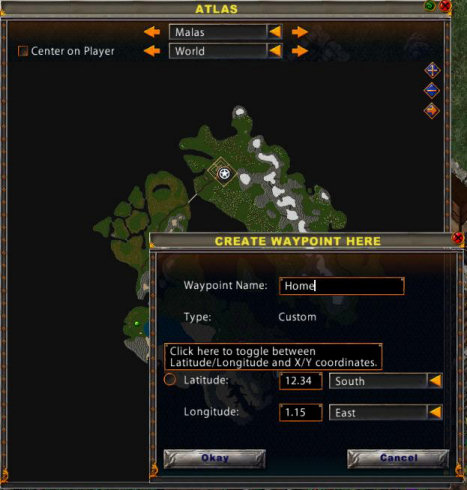
You will give your new waypoint a name. By clicking the circle next to Latitude you can view the x/y coordinates.
Pretty much to create a waypoint all you need to do it give it a name and select Okay.
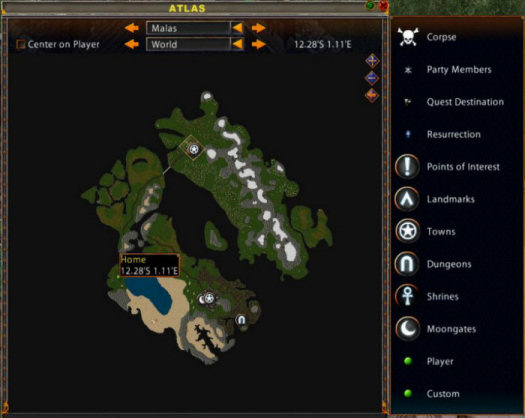
Your waypoint in the maps will show as a green circle, when you mouse over it displays the coordianates.
In game if you come across one of your waypoints it will look like this....
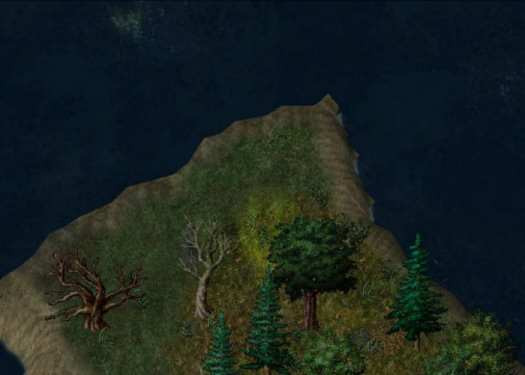
A pulsating green column of light, you can't miss it.
The map system is really very cool. You can view where your party members are by simply looking at the radar map. And its a great time saver for finding your corpse after an untimely death, it will even point you to the healers in the area.
There are many uses for creating your own waypoints. I use it often if I happen across and IDOC or even found a tree giving Frostwood. And it is a huge help for the Treasure Hunter or Fisher (yes you can mark waypoints anywhere including the water for marking SoS locations).
Mining With The SA Client
Mining is very well done in the SA Client. Here is how one Syndicate miner set herself up to make things much easier:
First thing I set a macro for mining.
Create Macro
Target by resource. Drop a shovel in box and choose ore.
Delay. I used 1.2 sec.
I repeated this sequence several times then enabled repeating and told it to repeat 10 times.
Then I got tired of clicking the ore all the time then targeting my beetles tag, so I dropped my large stack of iron into my hotbar and I have it a hot key. Now when I hid the key I the cursor comes up asking me what to smelt/combine with. This is sweet so as I go I make a whole hot bar just for the different ores. Verite gets the letter V and valorite get L, cause if you find Valorite your in luck. I havent completed my hot bar yet but someday i ll find some valorite.
That is the hot bar at the top of the screen.
I still have to click when I get random small pieces of ore but this still saves me some double clicking. That isnt enough though!!
Now I want a macro to target my beetle. Then I wont need to mouse over and click. For this I went to make macro>>I used target nearest follwer>>cursor target last. Since my llama follows my beetle my beetle is always closest.
A second Syndicate miner shares their thoughts on how they setup their mining:
With the enhanced client they made the macro needed for mining much better, we never have to reload the macro with shovels or chain it. My mining macro is this
That's the entire macro, it only needs to have the shovel dropped in the target by resource box once provided you don't run out of shovels. I make up 10 shovels in my pack then head out mining, it's awesome that they reload on their own. With the pack open you can see when you need to make more shovels.
Adding A Custom UI
The first step is to find the Custom UI you would like to use. There are a variety of sites you can find them at or you can make your own. For the purposes of this example we will use the following site: http://uo.modders-exchange.net/packaging . This site has been around since KR and is widely used by UO players. For this we are using the SA Copper custom UI.
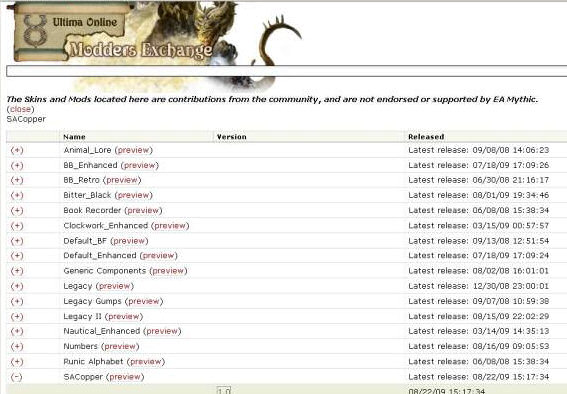
The picture above is the actual site, you need to click the + next to the UI you have interest in. We are download 1.0 of SACopper.
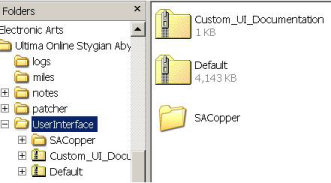
Once the file is downloaded right click the zipped folder, in this case named SACopper for the menu. Select extract all, this opens the Folders Extraction Wizard. Select Next, here you select what folder to extract files to. The skins are always placed in the SA User Interface folder.
The path is C:\Program Files\Electronic Arts\Ultima Online Stygian Abyss\UserInterface . The Browse button is very handy. Once the files are extracted your User Interface folder will look like this
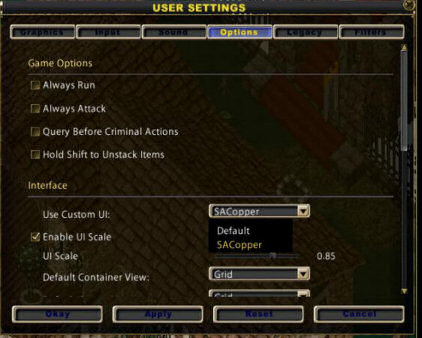
Now it's time to get back in game, you can select the UI to use at Login (top tab, Cutom UI) or choose the custom UI from the Main Menu. From your Main Menu in game select User Settings, then click the Options Tab. Under the Interface section there is "Use Custom UI" to the right of it, where it says Default, there is an arrow to open the menu. Clicking on the arrow you choose your new skin "SACopper". Select Apply and OK. Your done :)
©2025 The Syndicate. All rights reserved.